Hi Everyone!
I’m Jen from Blissful 55 and I am over the moon excited to be posting for HowDoesShe? today. I had to read and re-read the email asking if I was interested in sharing my tutorials because the idea that it was some elaborate prank seemed more realistic than these incredible women inviting me to come post on their site. The fact that it wasn’t a prank was such a wonderful surprise!
Bobbi asked if I would be willing to share my Dresser turned TV Stand tutorial…of course I would be willing! Be forewarned, this post warrants a ton of pictures…but they are good pictures, so it’s okay.
I found this dresser (briefly used as a plant stand as you can clearly see) for free on Craigslist. Oh Craigslist, you are my hero! I had been desperately looking for a dresser to turn into a TV stand and while this wasn’t the style I originally had in mind, the price was perfect! What’s more perfect than free?
 Overall, it was a pretty sturdy dresser and very well made. There were a few small nicks on the top and two of the legs had some significant chunks taken out of them, but I knew it still had great potential.
  This project certainly had it’s MANY ups and downs and I’m sure you would get a great laugh if you read all about it in my failure post, but I will spare you the details…for now and just show you the steps for what did work.
  My first order of business was to strip and sand the dresser of the varnish. I thought that the spray can of stripper would be enough as well as easier to use…don’t be fooled ladies, it doesn’t go very far AT ALL! I ended up having to take a second trip to Home Depot to get the quart size. Besides, what’s a good refinishing project without hundreds of trips to Home Depot? I took it as a sign that I was on the right track. Another piece of advice? Make sure to wear the rubber gloves as the directions say. They aren’t joking when they say it will burn. I accidentally got some on my skin…lesson learned!
I used a cheapy paint brush to brush on the stripper and then let it sit for approximately 15 min. until it started to bubble.
 Then I took my plastic scrapper and went to town. Some parts scrapped off super easy, others were a bit more stubborn.
  After I was done stripping, I sanded it down using 80 grit sand paper. Here it is in all it’s stripped and sanded glory.
 The next step was to fill in the nicks and chunks on the legs. I set up a system that allowed me to fill in the chunks by clamping a piece of wood that was level with the leg. This allowed me to fill in the leg and get a straight edge without having to try and create an edge from scratch. Make sense?
 I used wood filler and filled it all in.
  Now obviously I couldn’t leave it like that; I had to sand it smooth. I did that by using 80 grit and then 220 grit.
  The next step was to add my shelves. I found my shelves at Home Depot, just finished mdf, and had the handy guys that work there cut them to size. I glued them in using normal wood glue. Like my make-shift clamps?
 Now the cables have to go somewhere, so I drilled holes in the back. Not too big though, because I didn’t want them to be too noticeable. They are about 2 inches in diameter at the most.
  The top had some uneven spots, so I decided to add some 5mm finished plywood to the top.
  I used contact cement to adhere it to the top and then using a router, routed the edges to the correct size. I wanted to add some decorative trim to hide the edge of the plywood so another trip to Home Depot it was. I cut my trim at a 45 Degree angle and attached it using regular wood glue and clamps.

 It was finally time for primer. I highly recommend using a gray primer if your finished color is dark or bright. I think it really helped with the coverage.
  I did do some light sanding between coats to knock off the little nubbies and make sure it was super smooth. I applied a total of two coats and then finished with a clear coat just for good measure. And…..
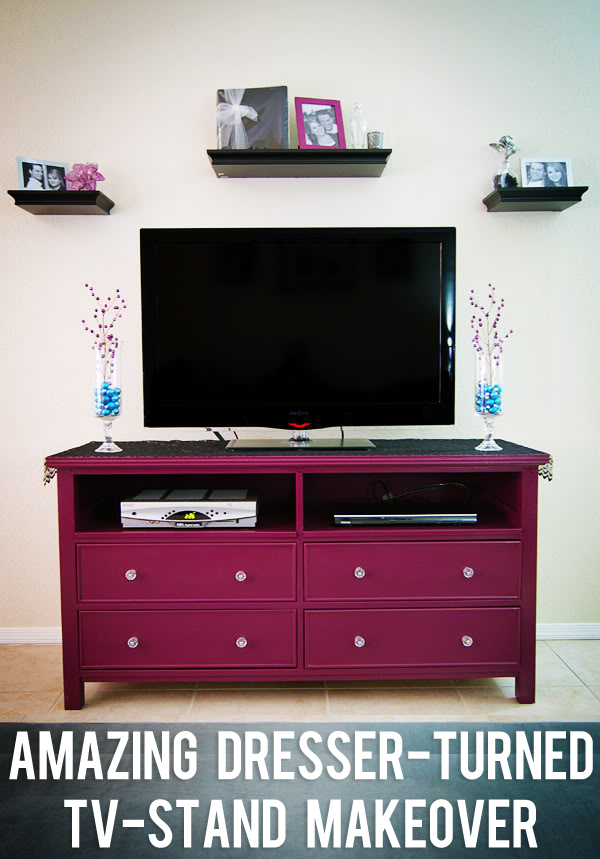
Voilà!
 I love how it turned out! It adds such a great pop of color in our living room and serves it’s purpose as a TV Stand extremely well.
I have to admit that I got many “curious”…more like judging looks from people when I explained I was going to make this dresser into a purple TV stand. Most reactions were along the lines of….PURPLE?!? But when all was said and done, I thoroughly enjoyed my “I told you so” moment.
One last look at the before and after.
 Thanks so much for letting me come and share my project with you! We hope you’ll take the time to visit us over at Blissful 55 to see what else we’ve been up to.


Mahi says
Thanks for sharing amazing content and you can also check firstwatchmenus.us
Marki says
What color (paint swatch) did you use? I’m absolutely in love with the color and considering it for a project of my own.
ninna says
Nice make over. I was wondering if you that make over by yourself? If that so, I would say you have a talent to be a carpenter! By the way it’s awesome…good job…true..!
Echo says
My mum runs a furniture store. I was given a great blue dresser with a wonky top drawer. We are moving into a new place at the end of the month, and I am doing this with the dresser. I’m so glad that I found this post. Its so perfect! Love the color, but I don’t think hubby would let me bring it home if I finished it in something this bright. Instead I’m doing mine in an antique cream/white, with a glossy black top and painting the insides of the shelf section and the sides of the drawers a bright teal/aqua. It’ll match my desk.
Nikki says
Brilliant! I would never have considered this colour but I love it. Great job.
Michelle L. Raftery says
Wonderful job on this project! If you don’t mind sharing, what is the name of this beautiful purple color? It’s perfect shade for my next project 😉
Elizebeth says
I love the color! It looks like a bit of work but I’d say the end result was worth it!
Candy says
Would love to know measurements of this dresser and size of tv that worked on it? Looks great!
nmagoni says
can you tell me the dimensions of your tv stand
Cynthia says
What a detailed tutorial, you make this too easy for us:) Thank you, brilliant idea!
Nelly says
How long did it take from beginning to end? I started a similar project inspired by this. I’ve started stripping, the drawers as well.
Tiffany says
Im doing mine now. Except I’m using Gripper Primer. Nervous && Excited!
mara says
First off…you did a great job!
Can you please tell me how tall this dresser is and how long it is? Also how big is your tv. I ask because I am trying to do something similar and I was thinking it maybe too tall to do.
Thank you for any insight you can give me
Paula says
Excuse me if this is silly question. I am wanting to do something like this. What is the “shelf” you bought from hardware store for the open spaces? You say you had it cut down, I just cant picture what you are referring to. Is it just a piece of wood?
Brandi says
I Love the color of this…I’m gonna turn my desk into a vanity and was looking for ideas and i love the color with the black lace definitely thinking about this color because I need something that is girly and just mine since I have two little boys and i have no girlishness around anymore. =)
leann says
What size is your tv?
Michelle says
This is PERFECT timing for me! I just purchased a dresser (same size as yours) for $30 from a thrift store as it has great features but a horrible finish. So excited to complete my project and I hope it turns out as well as yours!
Jen says
Wow! So many sweet comments. Thank you everyone!
Michael says
Hi Jen,
I liked so much what you did I decided to replicate it. The dresser is almost done (I will send pics) but I am having the hardest time finding the stemmed cylinder, the berry picks and haven’t a clue as to the metallic blue balls in the hurricane cylinder. Could you help. I have gotten close through ebay with all 3 items, However, Those colors really work for the rest of my room and I want them spot on and if you have a place to get the table runner, that would be great too.
Thank you in advance,
Michael
Laura says
You have inspired me! I am also from Saskatchewan (in a small town east of Saskatoon), and have a dresser that will soon not be needed in the girls’ room. And we need a tv stand – my husband got what he wanted for Christmas, a new big tv that doesn’t fit the old entertainment unit. I love the color you chose, and the sparkly drawer pulls!
Jen says
Aw YAY! I love to hear things like this. Thank you Laura. Good luck refinishing it. I would love to see a picture when you are done. Feel free to email us at [email protected]
Kir says
this is way out of my comfort zone, but I had to say WOW..I love it!! You did a fantastic job with this dresser, it is modern, beautiful and functional. WOW.
christine says
WOW! Great job! MY Mom & I love to do stuff like this!! Taking something you get for a great deal…FREE is always fantastic 😉 And turning it into something fabulous…Love it!
April says
Oh My Gah!!! That is rippin gorgeous!! Are you kidding me? Look I sit and watch ‘those’ Diy shows all the time..just absolutely wishing I could do that..I mean..after all..it just looks sooo easy..haha I’ve gathered that its not so much that everything is easy..its just that you have to jump in somewhere. This totally makes me want to figure out what a router is..LOL I mean ..I know you cut would with it but I’d probably not pick it out from a lineup. Anyway..enough rambling..but you rock, your purple tv stand rocks and thank you for the inspiration!
April says
cut “wood” with it, rather… lol
Jen says
Thank you April! It actually can be quite easy and I’m positive you could do it and it would be beautiful!
Tina says
Love it! Just wondered if you have ever heard of Annie Sloane paint. Way easy to do and lots of great colors. No stripping needed. Just a thought.
Jen says
Hi Tina,
I have heard of it from fellow bloggers but haven’t tried it yet. Where is the best place to purchase it?
Rikki-Dee says
Gorgeous!!!
Kelly says
Beautiful! Consider me inspired to jazz up the den with a project of my own!
Nancy T says
LOVE it and the colour. I may just have to see what I can find to make something similar!
Alison says
Whooo…I like that Jen! You take really cool pics!
Jen says
Thank you so much Alison!
Amy says
Wow! This is incredible! I love the bright plum color you used!
Jen says
Thank you Amy! It certainly adds a much needed pop of color in our living room 🙂
Vicki says
Wow – now that is a result! I have a small tv stand I’m thinking of painting, too bad it doesn’t have drawers as those glass knobs are adorable!
Jen says
Thank you Vicki! You should totally paint your tv stand. I do love the drawers though, not only for the knobs but the storage. I could use all the storage I can get…although I suppose it just encourages collecting more junk hehe.
Katy @ Live Laugh Love Craft says
Oh..my GOSH!! This is absolutely amazing! Pinning this and then immediately going to Craigslist to look for a dresser! You rock!!
Jen says
Thanks Katy! Craigslist is my hero hehe. Make sure to send me a before and after when you are all done! I’m sure it will turn out beautiful! [email protected]
Heather Lynne says
awesome!!! 🙂
Jen says
Thanks Heather!
Teri says
Did you spray or roll the paint? At first I thought the grey color was the color you were going. I liked it as a blue-grey, very nice. The cranberry is very nice too. What is the actual color you used.
Jen says
Thanks Teri! I really liked the grey too…maybe inspiration for another project? I sprayed the whole thing using a Wagner Power Painter Plus 6.6 with Behr’s Delicious Berry.
Jenni says
LOVE the color! So pretty!
Jen says
Thanks Jenni!