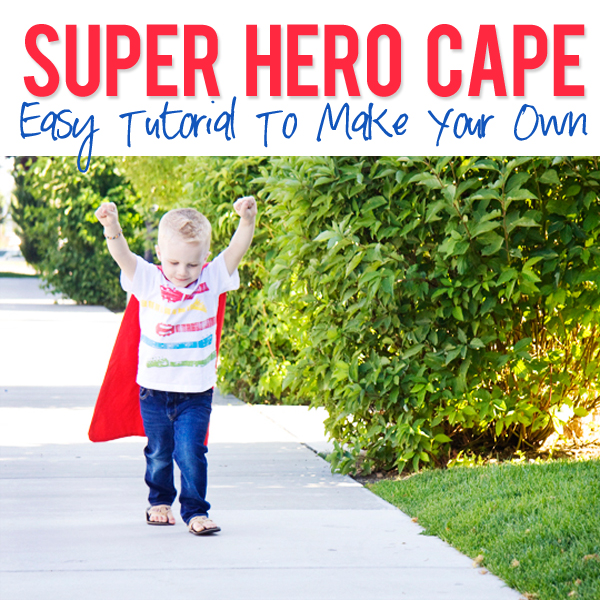

How to Make a Cape
How to make a cape for your little superhero is the focus of today’s tutorial! Because we know that all superheroes need a cape, we have put together this tutorial for you. Now, instead of trying to tie a blanket around your favorite superhero’s neck, you can quickly and easily learn how to make this super cape.
Supplies:
2 Yards of fabric
Thread
Velcro
Measuring Tape
Iron
Sewing Supplies
I made this cape with one color of fabric, however, you could easily get two different colors (1 yard of each) for a double-sided cape!
Tear two pieces of fabric 31 inches in length, then lay the two pieces on top of each other and fold them in half.

You will need a marking tool, such as chalk or a pencil (I used a black marker for viewing purposes.. don’t do this on your cape!). On one end of the fabric mark a line at 11 inches. On the other end mark a line at 5 1/2 inches.
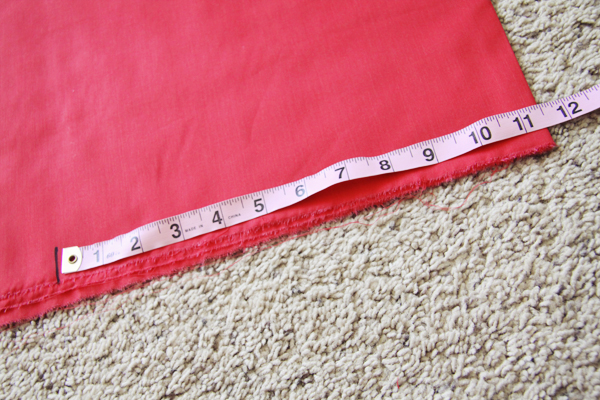
Using a measuring tape or a piece of long string, connect the two marks and draw a straight line between.

Cut your fabric 1/2 inch away from the line you just created and cut a straight line across the wider bottom edge.
 Find a bowl or plate that measures 8 inches across. Lay the round object on top of your fabric at 5 1/2 inches from the top and 4 inches from the fold. Then trace the object from edge to edge on your fabric.
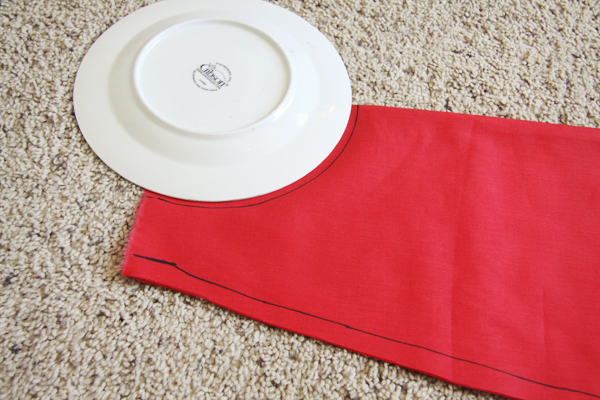
Next, cut 1/2 inch away from this round line you have created.
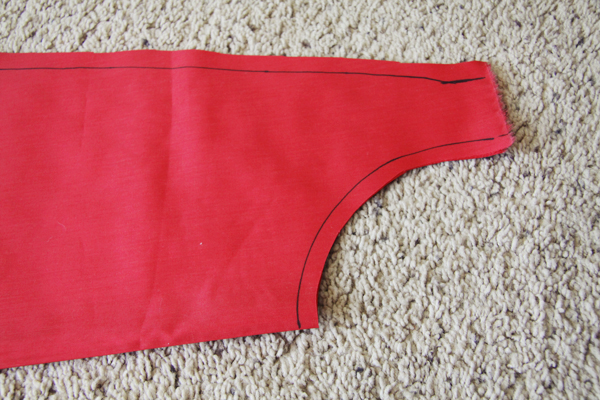
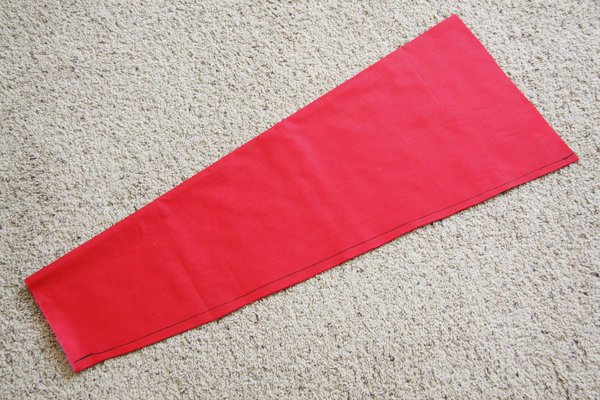
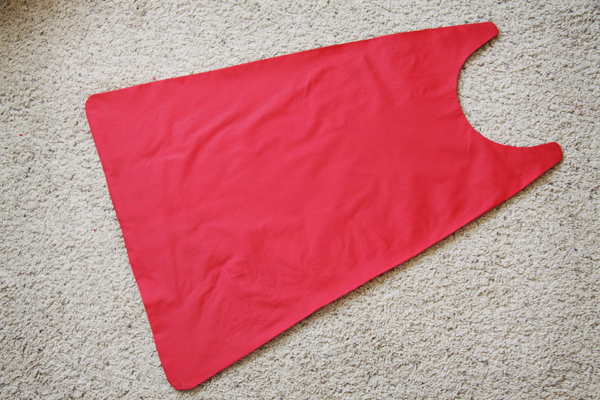
While the fabric is still folded, gently round the bottom and top corners of the cape (shown in the picture below).
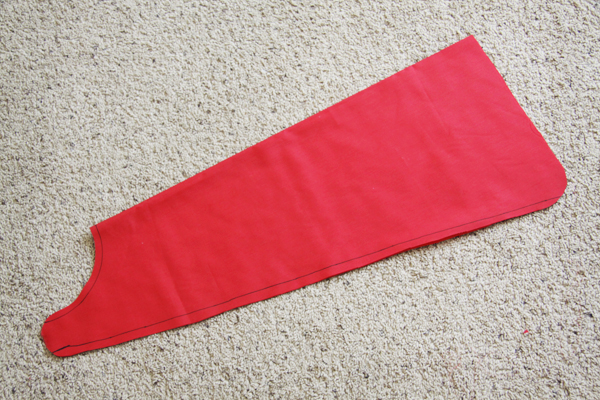
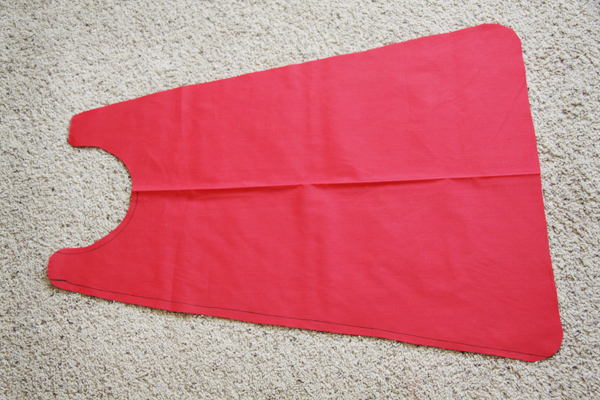
Unfold your fabric.
It’s looking like a cape!
Sewing Your Superhero Cape
Leave the two pieces of fabric lying on top of each other and head to your sewing machine. I didn’t bother pinning my cape, just make sure you keep them lined up while you are sewing. Sew around the cape at 1/2 inch and remember to back stitch. Leave a 2-inch opening so you can turn the cape right side out (I recommend leaving it on the bottom of the cape).
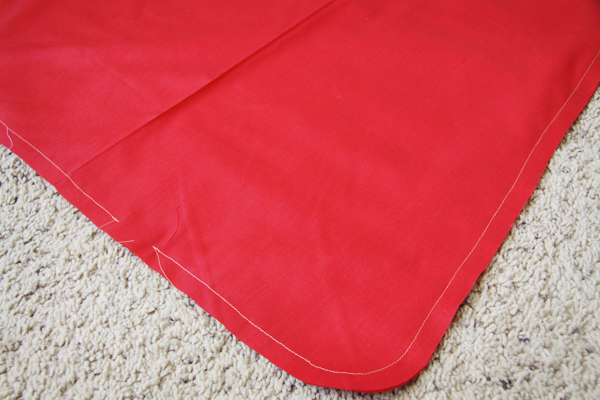
Once you have sewn, clip around the neck of the cape to relax the seam.

Turn the cape right side out! Warm up your iron and press the edges and all the wrinkles flat. Then hand sew that little opening closed.
Finally, this is my favorite part of how to make a cape. No more tying that blanket around your little one’s neck! Velcro to the rescue!!!
Cut a square of velcro. Sew the squares close to the edge, placing them on opposite sides of the cape. They will overlap when you put them together.
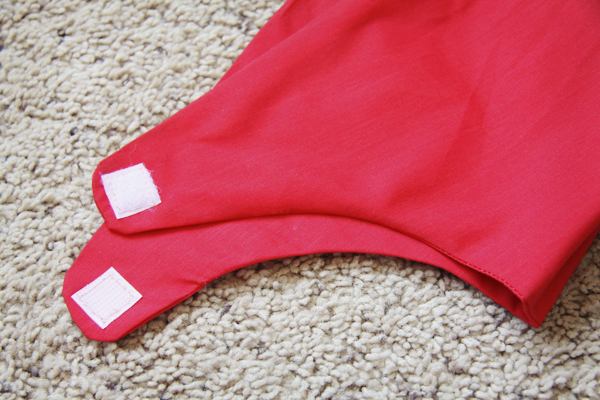
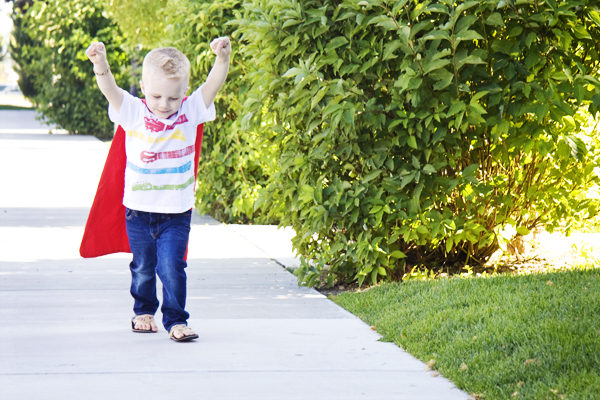
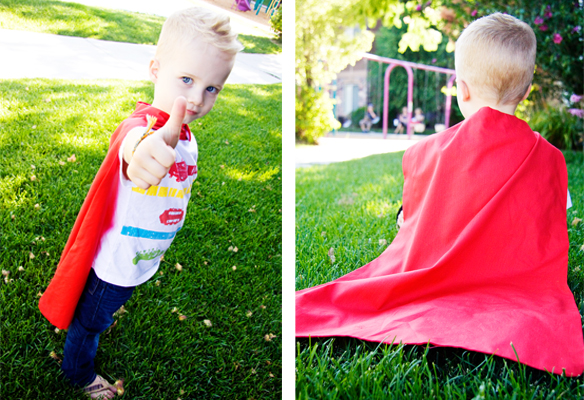
Get ready to make your child super happy! Attach it around the neck and watch them fly!
For more superhero fun, check out our superhero kit!


Sue says
What kind of fabric for cape? I am a beginner in seeing The cape looks great
Glenda Pasley says
You say the material should be 31” but how wide?
Roseanne leary says
I need to make a cape for my 8 year old granddaughter
What dimensions should I use and how much material should I get
Pat Hammerton says
Hello.
I am looking to make 2 capes for my grand-children birthday.
With the capes you made, will these fit 3 yr olds wearing size 5T and the other 4T?
OR do I need to increase something / somewhere?
Please let me know.
Thanks
Gramma Pat
Mississauga, ON CANADA
Rachel says
These dimensions fit my 3 year old and 5 year old perfectly, so I think you’ll be fine 🙂
Ann says
This was my first time trying anything like this and it hasn’t turned out perfectly! Thank you soooo much for this new tutorial. Made capes for my almost-4 year old son and his friend for a play date and they looked great! I also made them some masks and personalised the capes the their initials and added dinosaurs and stars. I can’t believe how easy your tutorial was to follow.
Ann says
That first sentence should read ‘it has turned out perfectly’.
Anna Cameron says
The fabric ends up needing to be at least 31inches x 23inches.
Just followed these instructions today to make a cape for my little boy. He is absolutely thrilled with it, thank you! It is the perfect size for him, he’s 4 but probably slightly taller than average. Great!
Melissa says
Great tutorial! My only complaint is that you don’t give the width dimensions in the very beginning. You mention to cut the piece of fabric so the length is 31 inches, but perhaps you can specify what the other dimension is, or at least what the starting fabric dimensions are.
Kathy says
I can not tell if you folded it the way , so it will be 36 in long do I put the plate on the folded size I have never done anything like this
Brenda says
In the 1st picture, do I fold the material in half by the length or width? How wide should the material be?
Sammy says
Thank you for step by step process for making a kiddo Cape and thank you for sharing your knowledge to us.
Julie says
Hi there– great tutorial! My 3 year old loves the cape but gets annoyed at the neck piece at his throat. Maybe because my material was a bit heavier (mink fabric on one side and felt on the other)? Any suggestions?
Teri says
Excellent tutorial, especially when you gave the dimensions.
Linda McCaulley says
Thank you so much! I work at a daycare and purchased a shower curtain with stripes on the bottom at the Goodwill for pennies. I cut out 2 super hero capes and they look amazing! So easy and the kids will love them!
les lie says
thank you! made my daughter a cape 2 years ago, and i’m so glad i found the post to make my son one too, i’m not an avid sewer and this was so helpful and easy to follow. checked a lot of websites & blogs and this was by far the best. thank you again!
Sal says
Thank you so much for the great guide! Im a beginner to sewing and found it really easy to follow and have successfully made my daughter a superhero cape for Children in Need day at school x
Dana L. says
So, am I cutting the 36 inch side down to 31 inches?? Sorry, first-timer here. My other length is 44 inches. Please help! Thanks 🙂
Claudia Capizzo says
This cape needs to be at least 14″ at the bottom.. I am so disappointed at the disproportion look.
Joanna Riddick says
Did you not see the pics before you started?
Sarah says
Hello,
I was just wondering what measurements you may have for a newborn sized cape? I am having troubles finding a size and I can’t measure because I don’t have a newborn handy??
I want to make one for my friend for a shower gift.
Monique says
Were you able to find any newborn measurements??
Lara says
I actually don’t have measurements for smaller or larger cape sizes. I was able to come up with the child cape measurements through trial and error with my son. You could probably just take away some length and width and use a smaller round object for the neck of the cape. And same for a larger cape. Just add length and width with a larger round object for the neck opening! I’m sorry I don’t have more specifics on smaller or larger sizes for everyone!
megsa says
Very easy tutorial.. what kind of fabric did you use? doesnt look like satin
Nancy says
I found costume satin at Joann Fabric. Works great, is inexpensive, nice weight, shiny and washable. It is a great fabric for all kinds of projects.
Lara says
This is just 100% cotton quilting fabric!
kristen says
this is a great tutorial! i just made one for a friend’s kid’s birthday and it was so easy!
the sewing machine part almost killed me, but we both made it out alive! there is a point in every project where my sewing machine just decides it is done – like a temper tantrum…
i agree with the kristen before me that adding the velcro on 1 piece before sewing them together would hide any unsightly sewing incidents.
i made mine with 2 colors – pink and purple. there is an alarming shortage of superhero-anything for girls, so this was a perfect project. thank you for posting it 🙂
Kristen says
I loved this tutorial! I made three of these today while the kids were napping (start to finish, it took me about 1-1/2 hours to do three), and it couldn’t have been easier. I ended up using just 1 yard each of fabric for the capes (fold in fourths, then just cut one edge at an angle to get the basic shape). The only change I would suggest would be to sew the velcro onto the cape before you sew the two halves together — that way the stitching from the velcro would be “hidden” inside the lining. I didn’t, and I wish I had! I used stich-wichery to close up the opening I left for turning, so no hand sewing involved! That won’t last, but it meant the kids could play immediately after nap time. Fantastic project!
Alisha says
I used this pattern to make capes for my son’s Halloween costumes. (Super Nerds) I saved my husband’s silver blanket from running a marathon, and cut it to your specs. Glued some Velcro tabs to it. And voila! No sew – perfecto!! Thank you!
MO says
Just wondering the best way to make this adult-sized… I would like a cape that comes just past my waist, but I’m concerned about the width and the neck size. Does anyone have any suggestions??
Tiffany Garrett says
I just finished making a cape based on this tutorial and it turned out perfect! Thank you so much for sharing it with us. (Pic was taken before I ironed it so it really does look better than the pic lets on!)
https://www.facebook.com/photo.php?fbid=677046412313410&set=a.149590265059030.25416.100000241722688&type=1&theater
merav says
Thanks for posting – I’ve searched online, and your cape was the nicest! I’ve made two for my daughter, so that she could play with friends coming for a play date, but she’s wearing them every day to daycare…
Felicia says
My daughter was invited to an Avengers themed party and I waited until the last second… Vegetarian Girl was born, thanks to your tutorial! I blogged about it here http://therealeversewsweet.blogspot.com/2013/02/super-heroes-super-bowl-and-diabetic.html. Thank you!!!
Melody says
Thank you so much for this tutorial — you did a great job. I ended up using it to make super hero capes for my kids, and my nephews and nieces. That’s what everyone’s getting for Christmas this year! I referenced your link on my blog if you’d like to check it out — http://testingtrendy123.blogspot.com/2012/12/its-bird-its-plane-itsmy-kid.html
Being Inspired says
Thanks so much for this!! I was struggling with dimensions for my cape but you’ve been a life saver! 🙂 And now I’ve just finished my Princess Super Hero cape and am pretty delighted with it! 🙂 Princess Cape
Crystal says
Can you get a second cape from the other side/left over material?
GGAdams says
I did, but with a pattern on the second fabric, the second capes design was upside down. No one cared.
Melinda says
I was able to get two capes out of the material by folding it differently. Instead of folding the 31″ fabric in half, I folded it just to 12″. Then after I cut out the cape, I had a large piece left over and folded that one to get another cape. I just did the measurements on the opposite ends so my 11″ measurement was on the side that the other cape’s 5.5″ measurement was on. Hope that makes sense.
Vénusia says
Wonderful tutorial. I just blogged about it today and linked to you !
Karin says
Thank you! This was so simple, yet exactly what my son wanted. I have now made him a cape in less than 40 minutes. Great.
Stephanie says
Thank you SO much for this post! The step-by-step directions were SO helpful! You rock!
Jenn says
I just made two of these for my boys for Christmas and they were so easy! I finished the first one in about an hour and a half and the second in 45 minutes! Thank you so much for such a wonderful, easy-to-follow tutorial! Love!
Hannah says
cute photos!
Michelle {Fun On A Dime} says
Must be in the air… I just posted about my super hero capes on Monday! lol I like how easy your tutorial looks. My post is more about personalizing the capes. Great job!
Tracy Lafortune says
Will these measurements you made the super hero cape with fit my 4 year old granddaughter correctly?
Mindy says
thank you! pinning for my neice and nephew’s christmas gifts!