unique, and easy to make!

What you’ll need:
*1 – 18×24 frame of choice with glass included (I found mine at
Michaels,…don’t forget your coupons)
*1- 18×24 additional piece of cut glass (call your local glass or
plexi-glass shop for a custom cut. My piece cost me about $10)
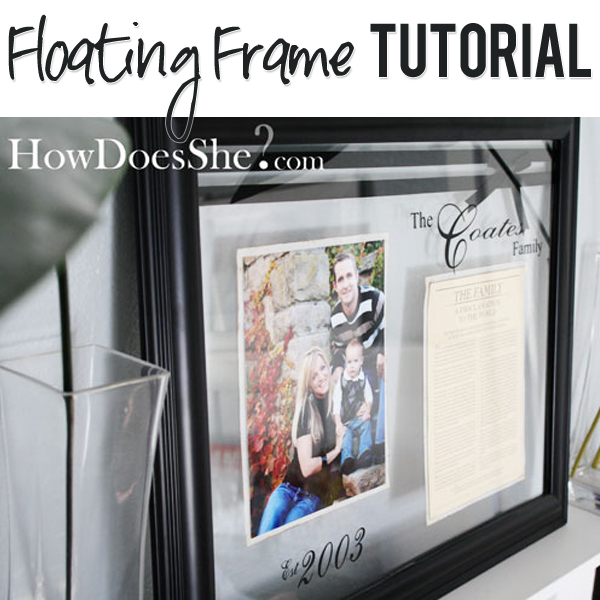
*1- 8×10 Family Picture
*1- 8×10 Document of choice (Family Motto, Proclamation to Family,
Another picture?)
*2- 8×10 Pieces of Vellum paper
*Ink Distress Pad
*Vinyl Lettering of choice
*Ribbon of choice
*Hot Glue Gun
*Tape

table. This is what you will be taping everything to.

than the 8×10 vellum paper, leaving a nice border.

Ink Distress the edges on both sheets of vellum, the family picture, and
the document. 
Use two-sided sticky tape and place the picture, document, and ribbon on
custom cut 18×24 glass sheet. 

Flip your finished glass sheet over and place it in your 18×24 frame
(with original glass included).
Both glass sheets will lay on top of each other in the frame like this.
Use a hot glue gun in the four corners to hold the glass in the frame.
Throw out the cardboard back that usually holds glass in place. Let
Dry.
 Flip the frame over so you are looking at it correctly. Add Custom Vinyl
to the original glass in the frame. (HowDoesShe uses MyTalkingWalls. You can usually
find someone locally as well).

{Tada!}
Display for all to see and be proud you made it!
Easy as pie!


Karen Shaw says
Awesome idea. My father passed away and I wan’t to find a way to use the memorial card and poem with his picture. I do think I could use the as a basic tutorial.
carl says
im making on for my daughters mother…well a variation of such.. i for some reason am bamboozled on teh ribbon. did you just tie a bow and flatten it? yes its 1:30 am…and i should be in bed but this is when im most creative 😀
Katie says
Yes that’s all you have to do! Just stick it on like the rest of the ribbon and you’re good! Good luck!
Dawn says
Shelley – I love this~ Can you tell me the size you used for the vinyl letters??? thanks!~
Dawn says
I absolutely LOVE this~! I am going to make a couple for gifts and I was wondering what the wording was right underneath “Family Motto”……?? I’d like to print something similar and I’m not creative at all – so need your help!!!
thanks for your great ideas!~
Kristi Narvaez says
I am currently making a floating picture frame as a gift- i have a problem though! i have no way of securing the glass in the frame. It is a 20×20 so it is fairly large…Although i am sure the hot glue gun works, is there another method that i can try? Any Ideas?… anyone at all?
Stephanie says
I love this! I am featuring it on crazydomestic.com on 10/26. Thanks for the inspiration!
-Steph
CaLynn says
Hi! I am on the lookout for an 18×24 float frame and I cant seem to find one to buy. But here you are offering a tutorial! How splendid!! I have a question about it though – i would like to use the frame to highlight a small wall hanging type object. Would this method work for something as thick as a few layers of fabric, or is it limited to photo thickness only? Thanks so much:D
Alison says
Ya it would work for fabric. This way is nice because the medium in the picture can be think and it will still work:)
CaLynn says
Awesome, thank you so much for the tutorial 😀
Cathy says
Yes, So I’m super behind on times… but I just love this! Will you just make one for me because I am a fellow blogger that has NO time!? 🙂 I’ll pay you! Better yet – just come give my house a decor makeover!!!
.-= Cathy´s last blog ..Disney Store Discount =-.
June says
This is such a great idea for gifts! Thanks for the ideas you share with us!
Jacquilyn Avery says
We made it! I host Crafty Crafty Ladies Night the first Saturday of each month and for March we followed your tutorial!! Check out my blog for pics!!
http://sandjavery.blogspot.com/2010/03/march-ccln-brag-book.html
Misty says
I would love to look at the floating frames you made for more inspiration in making my own, but it says I have to be invited to view your blog.
If you get this msg, Im [email protected] I have a google account.
thanks,
Misty
Shelley says
You shouldn’t have to be invited. Weird. Try again maybe? Let me know if you still have problems.
Crystal Applegate says
I am in LOVE with this idea! I am going to have to try it soon!
CindyH says
Can I just say, I can’t get enough of your craftiness today? I am overwhelmed with your creativity! Thank you, Thank you, Thank you!!
Michelle says
I’m sooo not crafty, but I LOVE this. I’m definatly going to try this! But how do you hang this? Or is it better if you just lean it against the wall?
Alison says
Either way will look great! The frame was prebuild and it already had holes in it to hang it.
Shelley says
They are on their way over to your house Missy. 😉
Hani says
I’ve done one!:) but I didn’t use another glass for the backside. I used a thick plastic instead. I would love it if you have a look and give some comments on it.
Thank You!:D
cindy says
Totally beautiful and great tute! Would love to try this with my wedding announcement (from back in ’86).
Glad you could Mi4M 🙂
Ashley Garrett says
An idea for the document.. A favorite bible verse that you love or a quote. I think thats what I’m going to use.
Thanks for the tutorial
Abby says
I love your idea. Does gluing the glass in the frame makes it hard to switch out a family picture as you need to update it? Thanks for sharing.
Shelley says
It’s fairly easy. Just gently pull off the glue. Make sure you don’t use too much up front! 🙂 Thanks for asking!
Laura says
May want to use Museum putty or 3m removable mounting and repositioning. for the temporary parts. Great project
Stephanie says
I am featuring this idea on my site this Tuesday! Thanks for the great tutorial!
Hani says
aaaaa!! that’s incredibly creative!♥ I’ve always wanted a frame (or frames) like that in our living room. omg. I think I’m gonna start taking the picture frames off the wall now. lol.
will do leave you my blog URL if I already made something. btw (remember me?) still in search for the vinyl… and not giving up:D
Sarai says
Just found your site after reading the post on Sisters Stuff! I have one of these in our home and get so many compliments on it! Here’s a tip: you can save the trouble of getting the extra piece of glass cut by buying frames with 2 pieces of glass. I’ve found them at Target and sometimes at Wal-Mart and they usually cost around $15 bucks. Thanks for sharing!
Kim @ Cheap Chic Home says
Very pretty, I like the 3D effect.
Chris says
Oh – Love this Idea!
will def.. be putting this on my to do list!
Thanks for the tutorial!
Crystal says
I love this idea. Its so pretty.
Sherry says
That is really pretty. Very creative look.
Julie says
Just what I needed to see! I’ve been trying to figure out some way to put our wedding picture on display with our invitation and I think I’ve found it! Thanks for the inspiration!
Allison says
LOVE IT! I am glad you posted this because I some how missed it on U Create. Looks like I have one more project to add to my list of things to make! Thanks for sharing!
Ava says
Wow! You guys are amazing! This looks incredible! Looks like I will need to get some friends together for a ‘How She Does’ Craft Night!
Steffany says
absolutely beautiful, this is my favorite way EVER to display the proclamation